IB Design Technology IA: A Guide to the Design Cycle
Are you an IB Design Technology student aiming for a stellar IA (Internal Assessment) score? Or perhaps a teacher looking for ways to guide your students more effectively? The Design Cycle is the backbone of the Design Technology IA, and mastering it is crucial for success. This guide will break down each stage of the Design Cycle, providing practical tips, strategies, and insights to help you navigate the IA process with confidence. We'll explore each criterion, offer real-world examples, and even discuss how AI-powered tools can revolutionize your approach to assessment and feedback. By the end of this post, you'll have a clear roadmap to crafting a high-scoring Design Technology IA.
Introduction (Answer the Query Immediately)
The IB Design Technology IA requires a deep understanding and application of the Design Cycle. This cycle, comprised of Empathize, Define, Ideate, Prototype, and Test (or Present), is the framework for your entire design project. This guide will walk you through each stage, providing actionable advice and examples to help you excel. We'll cover everything from identifying user needs to creating a final, well-justified solution. Whether you're just starting your IA or looking to refine your work, this comprehensive guide will provide the knowledge and tools you need to succeed in your IB Design Technology IA. We'll also touch on how innovative AI grading assistants can help both students and teachers streamline the assessment process.
Struggling with IB Assessments?
Get instant, detailed feedback on your work with AI that understands IB criteria.
Understanding the Design Cycle: A Step-by-Step Guide
The Design Cycle is a structured approach to problem-solving and innovation. It's not a linear process; you may find yourself revisiting earlier stages as you learn more and refine your design. Let's dive into each stage:
Criterion A: Empathize (0-9 Marks) - Understanding User Needs
"To what extent does the student identify and investigate a real user problem/need?"
This is where your design journey begins. You need to identify a real-world problem or need and thoroughly investigate it. This isn't just about finding a problem; it's about understanding the user's perspective, their challenges, and their motivations.
-
Actionable Advice:
- Go Beyond the Surface: Don't just identify a problem; delve into its root causes.
- Conduct Thorough Research: Use surveys, interviews, and observations to gather data.
- Focus on a Specific User Group: Narrowing your focus will allow for more targeted and effective solutions.
- Document Everything: Keep a detailed record of your research, including quotes, data, and observations.
-
Example: Instead of simply identifying "lack of accessible transportation," investigate the specific challenges faced by elderly individuals with mobility issues in your local community. Conduct interviews with residents of assisted living facilities and observe their experiences using public transportation.
-
Mark Band Guidance:
- 1-3 Marks: You've identified a problem, but your understanding is superficial. You need to conduct more in-depth research.
- 4-6 Marks: You've identified a relevant problem and conducted some user research, but your understanding of user needs is still limited.
- 7-9 Marks: You've identified a well-defined problem, grounded in context, and conducted thorough research, demonstrating a deep understanding of user needs.
Criterion B: Defining the Project (0-6 Marks) - Crafting a Clear Design Brief
"To what extent does the student formulate a clear design brief and specifications?"
Based on your research, you need to formulate a clear and concise design brief that outlines the scope of your project. This brief should include detailed design specifications (requirements) derived directly from your user research.
-
Actionable Advice:
- Be Specific: Avoid vague language. Use quantifiable terms whenever possible.
- Prioritize Requirements: Rank your design specifications based on their importance.
- Justify Your Requirements: Explain why each specification is important based on your user research.
- Use the SMART Framework: Ensure your specifications are Specific, Measurable, Achievable, Relevant, and Time-bound.
-
Example:
- Poor Specification: "The device should be easy to use."
- Improved Specification: "The device should require no more than three steps to operate, as demonstrated by a usability test with elderly users achieving a success rate of at least 80%."
-
Mark Band Guidance:
- 1-2 Marks: Your design brief or specifications are vague and incomplete.
- 3-4 Marks: Your design brief identifies some relevant parameters, and your specifications outline the main requirements, but they are limited.
- 5-6 Marks: Your design brief is clear, and all relevant requirements are fully justified by your research.
Criterion C: Ideation and Modelling (0-6 Marks) - Generating and Testing Ideas
"To what extent does the student develop ideas and prototype solutions?"
This stage is all about creativity and experimentation. Generate a wide range of design ideas, select one that best addresses your design brief, and create models or prototypes to test its feasibility.
-
Actionable Advice:
- Brainstorm Extensively: Don't limit yourself to obvious solutions. Explore unconventional ideas.
- Sketch and Diagram: Use visual aids to communicate your ideas effectively.
- Create Multiple Prototypes: Start with low-fidelity prototypes (e.g., paper models) and gradually increase complexity.
- Test and Iterate: Gather feedback on your prototypes and use it to refine your design.
-
Example: If you're designing a device to assist with gardening, create prototypes using cardboard, foam, and other readily available materials. Test the prototypes with real gardeners and gather feedback on their ergonomics and functionality.
-
Mark Band Guidance:
- 1-2 Marks: You've generated few ideas, provided little justification, and done minimal modelling.
- 3-4 Marks: You've generated a reasonable range of ideas with some justification, and developed at least one prototype or model.
- 5-6 Marks: You've explored a wide range of creative ideas, provided a well-justified selection, and effectively prototyped key features.
Criterion D: Designing a Solution (0-6 Marks) - Detailing Your Final Design
"To what extent does the student develop a detailed final design solution?"
This is where you create a comprehensive and detailed plan for your final design. This includes detailed drawings, CAD models, schematics, and explanations of how your design works.
-
Actionable Advice:
- Use Industry-Standard Tools: Utilize CAD software, sketching tools, and other relevant technologies.
- Provide Clear and Accurate Drawings: Include multiple views, dimensions, and annotations.
- Explain Key Features: Describe the functionality and purpose of each component.
- Justify Your Design Choices: Explain why you chose specific materials, components, and manufacturing processes.
-
Example: If you're designing a robotic arm, create detailed CAD models showing all the components, joints, and actuators. Include a bill of materials listing all the parts required.
-
Mark Band Guidance:
- 1-2 Marks: Your final design is present but incomplete, with many details missing.
- 3-4 Marks: Your final design is mostly complete, with explanations of key features.
- 5-6 Marks: You've created a comprehensive final design (multi-view drawings or CAD) with all functionality and aesthetics detailed and fully justified.
Criterion E: Presents a Solution (0-6 Marks) - Justifying Your Design
"To what extent does the student present and justify the chosen solution?"
This is your opportunity to showcase your final design and explain why it's the best solution to the problem you identified. You need to clearly present your design and justify how it meets all the design criteria you established in your design brief.
-
Actionable Advice:
- Create a Compelling Presentation: Use visuals, diagrams, and prototypes to engage your audience.
- Clearly Explain Your Design: Describe the functionality, aesthetics, and user experience of your design.
- Justify Your Design Choices: Explain how your design meets each of the design specifications you outlined in your design brief.
- Address Potential Limitations: Acknowledge any limitations of your design and suggest potential improvements.
-
Example: Create a presentation that includes photographs of your prototype, CAD models of your final design, and a video demonstrating its functionality. Explain how your design addresses the needs of your target user group and meets all the design specifications.
-
Mark Band Guidance:
- 1-2 Marks: Your solution is described with limited rationale.
- 3-4 Marks: Your solution is presented clearly, addressing most criteria.
- 5-6 Marks: You've created a very clear, logical presentation with explicit justification of how all criteria are met.
Common Challenges and Mistakes in the Design Technology IA
Many students struggle with similar challenges when completing their Design Technology IA. Here are some common pitfalls to avoid:
- Insufficient Research: Failing to conduct thorough user research can lead to a poorly defined problem and ineffective solutions.
- Solution: Dedicate ample time to research and gather data from your target user group.
- Vague Design Brief: A poorly defined design brief can result in a lack of focus and direction.
- Solution: Use the SMART framework to ensure your design specifications are clear, measurable, and achievable.
- Lack of Prototyping: Skipping the prototyping stage can lead to design flaws and usability issues.
- Solution: Create multiple prototypes and test them with real users to gather feedback and refine your design.
- Inadequate Justification: Failing to justify your design choices can result in a lower score.
- Solution: Clearly explain how your design meets each of the design specifications you outlined in your design brief.
- Poor Time Management: Procrastination can lead to rushed work and lower quality.
- Solution: Create a detailed timeline and break down the IA into smaller, manageable tasks.
Advanced Tips and Strategies for a Top-Scoring IA
Ready to take your IA to the next level? Here are some advanced tips and strategies:
- Focus on Innovation: Strive to create a novel and innovative solution to the problem you've identified.
- Consider Sustainability: Incorporate sustainable design principles into your project.
- Demonstrate Critical Thinking: Show that you've carefully considered the pros and cons of different design options.
- Seek Feedback Regularly: Ask your teacher, peers, and other experts for feedback throughout the IA process.
- Reflect on Your Learning: Reflect on what you've learned throughout the IA process and how you've grown as a designer.
Pro Tip: Get AI-Powered Grading
Stop second-guessing your grades. Get instant feedback aligned with official IB rubrics.
Technology and Modern Assessment: Leveraging AI in the IB
Technology is transforming education, and assessment is no exception. AI-powered tools are revolutionizing the way students learn and teachers assess their work. In the context of the IB Design Technology IA, technology can play a significant role in various stages of the Design Cycle. CAD software, simulation tools, and data analysis platforms can enhance your design process and improve the quality of your work.
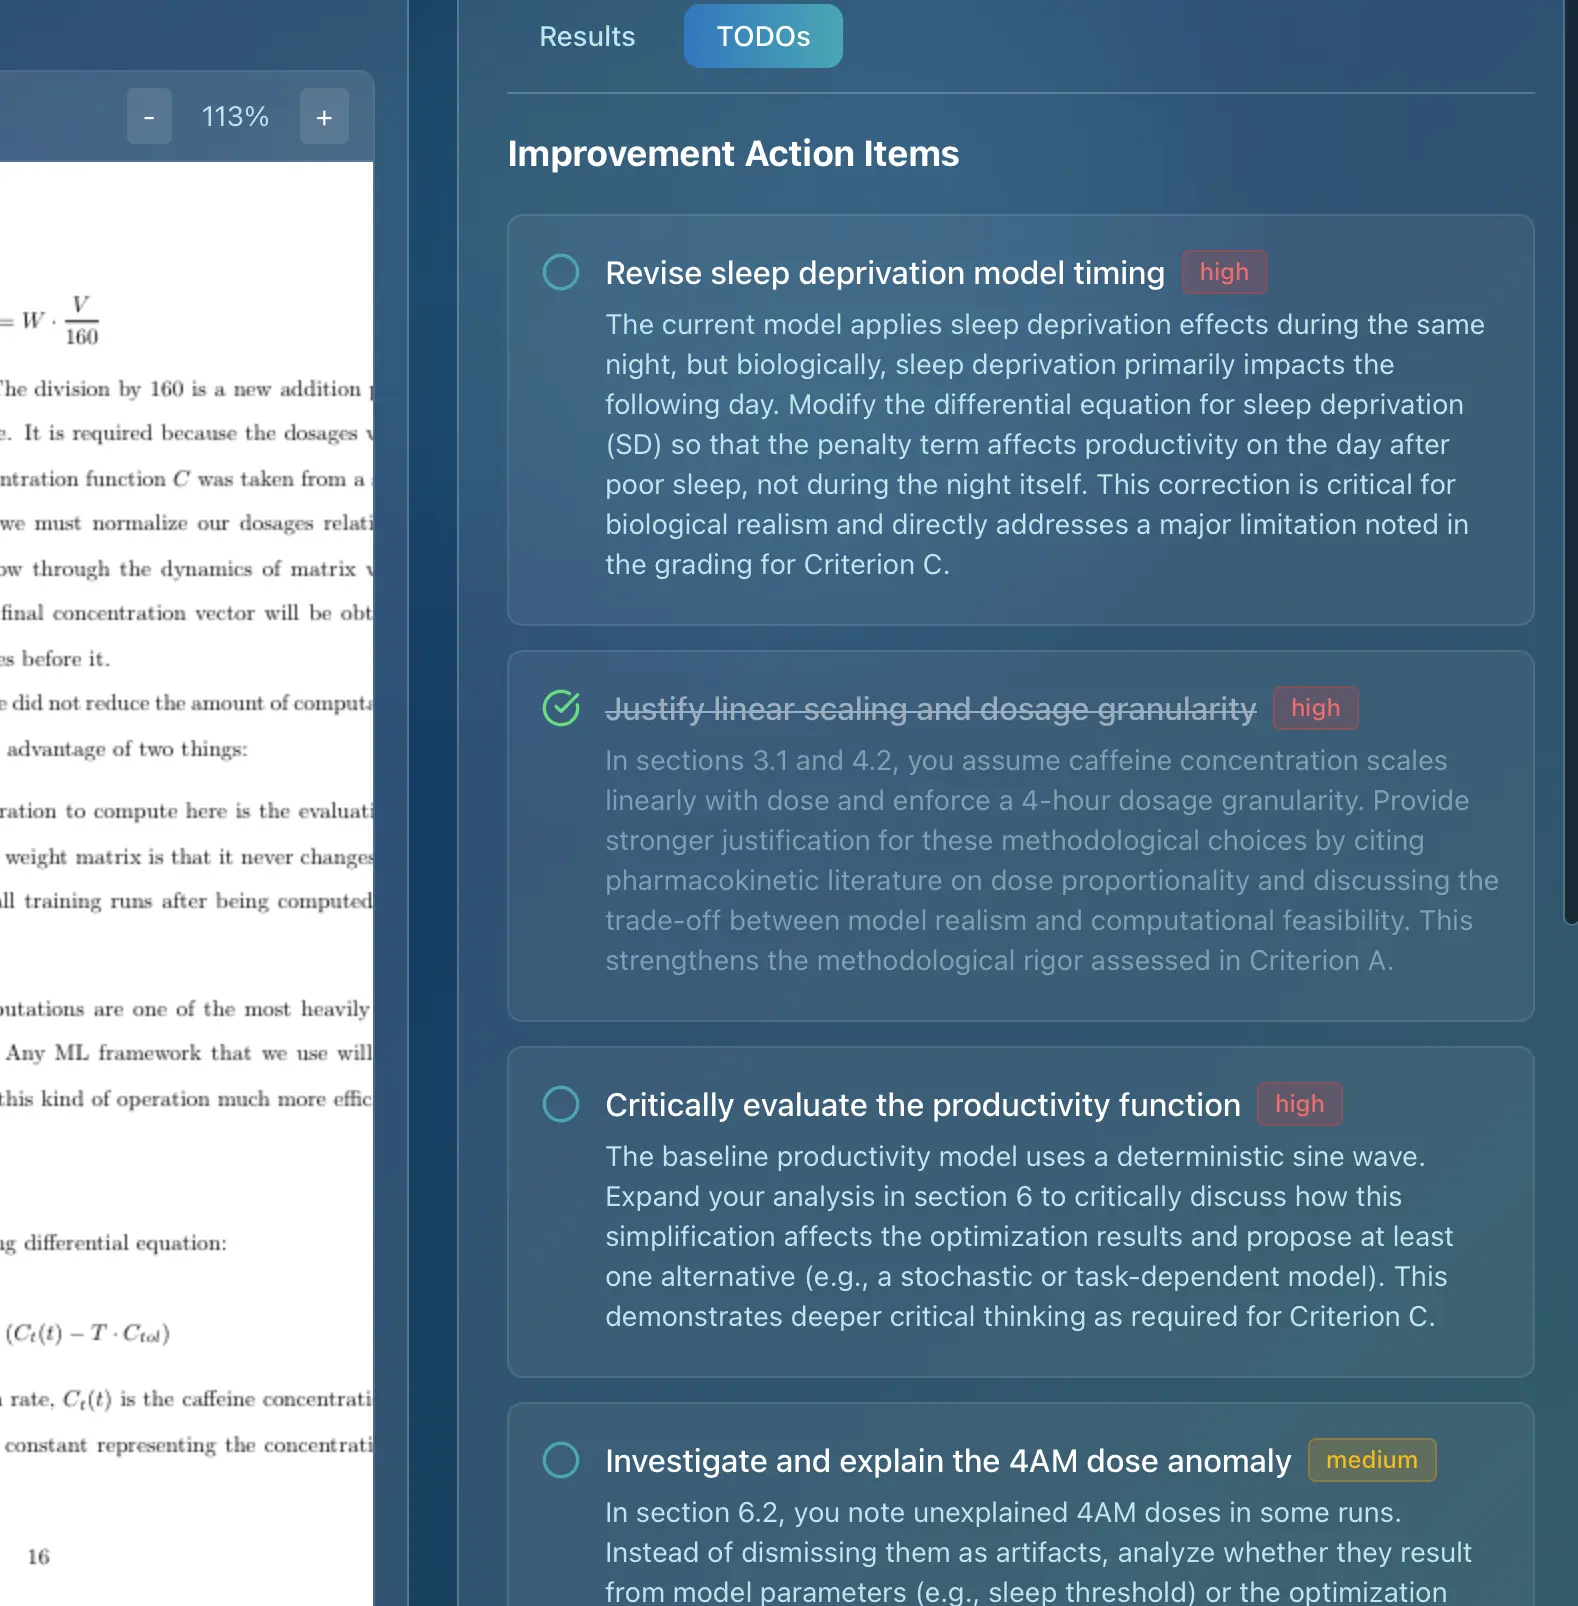
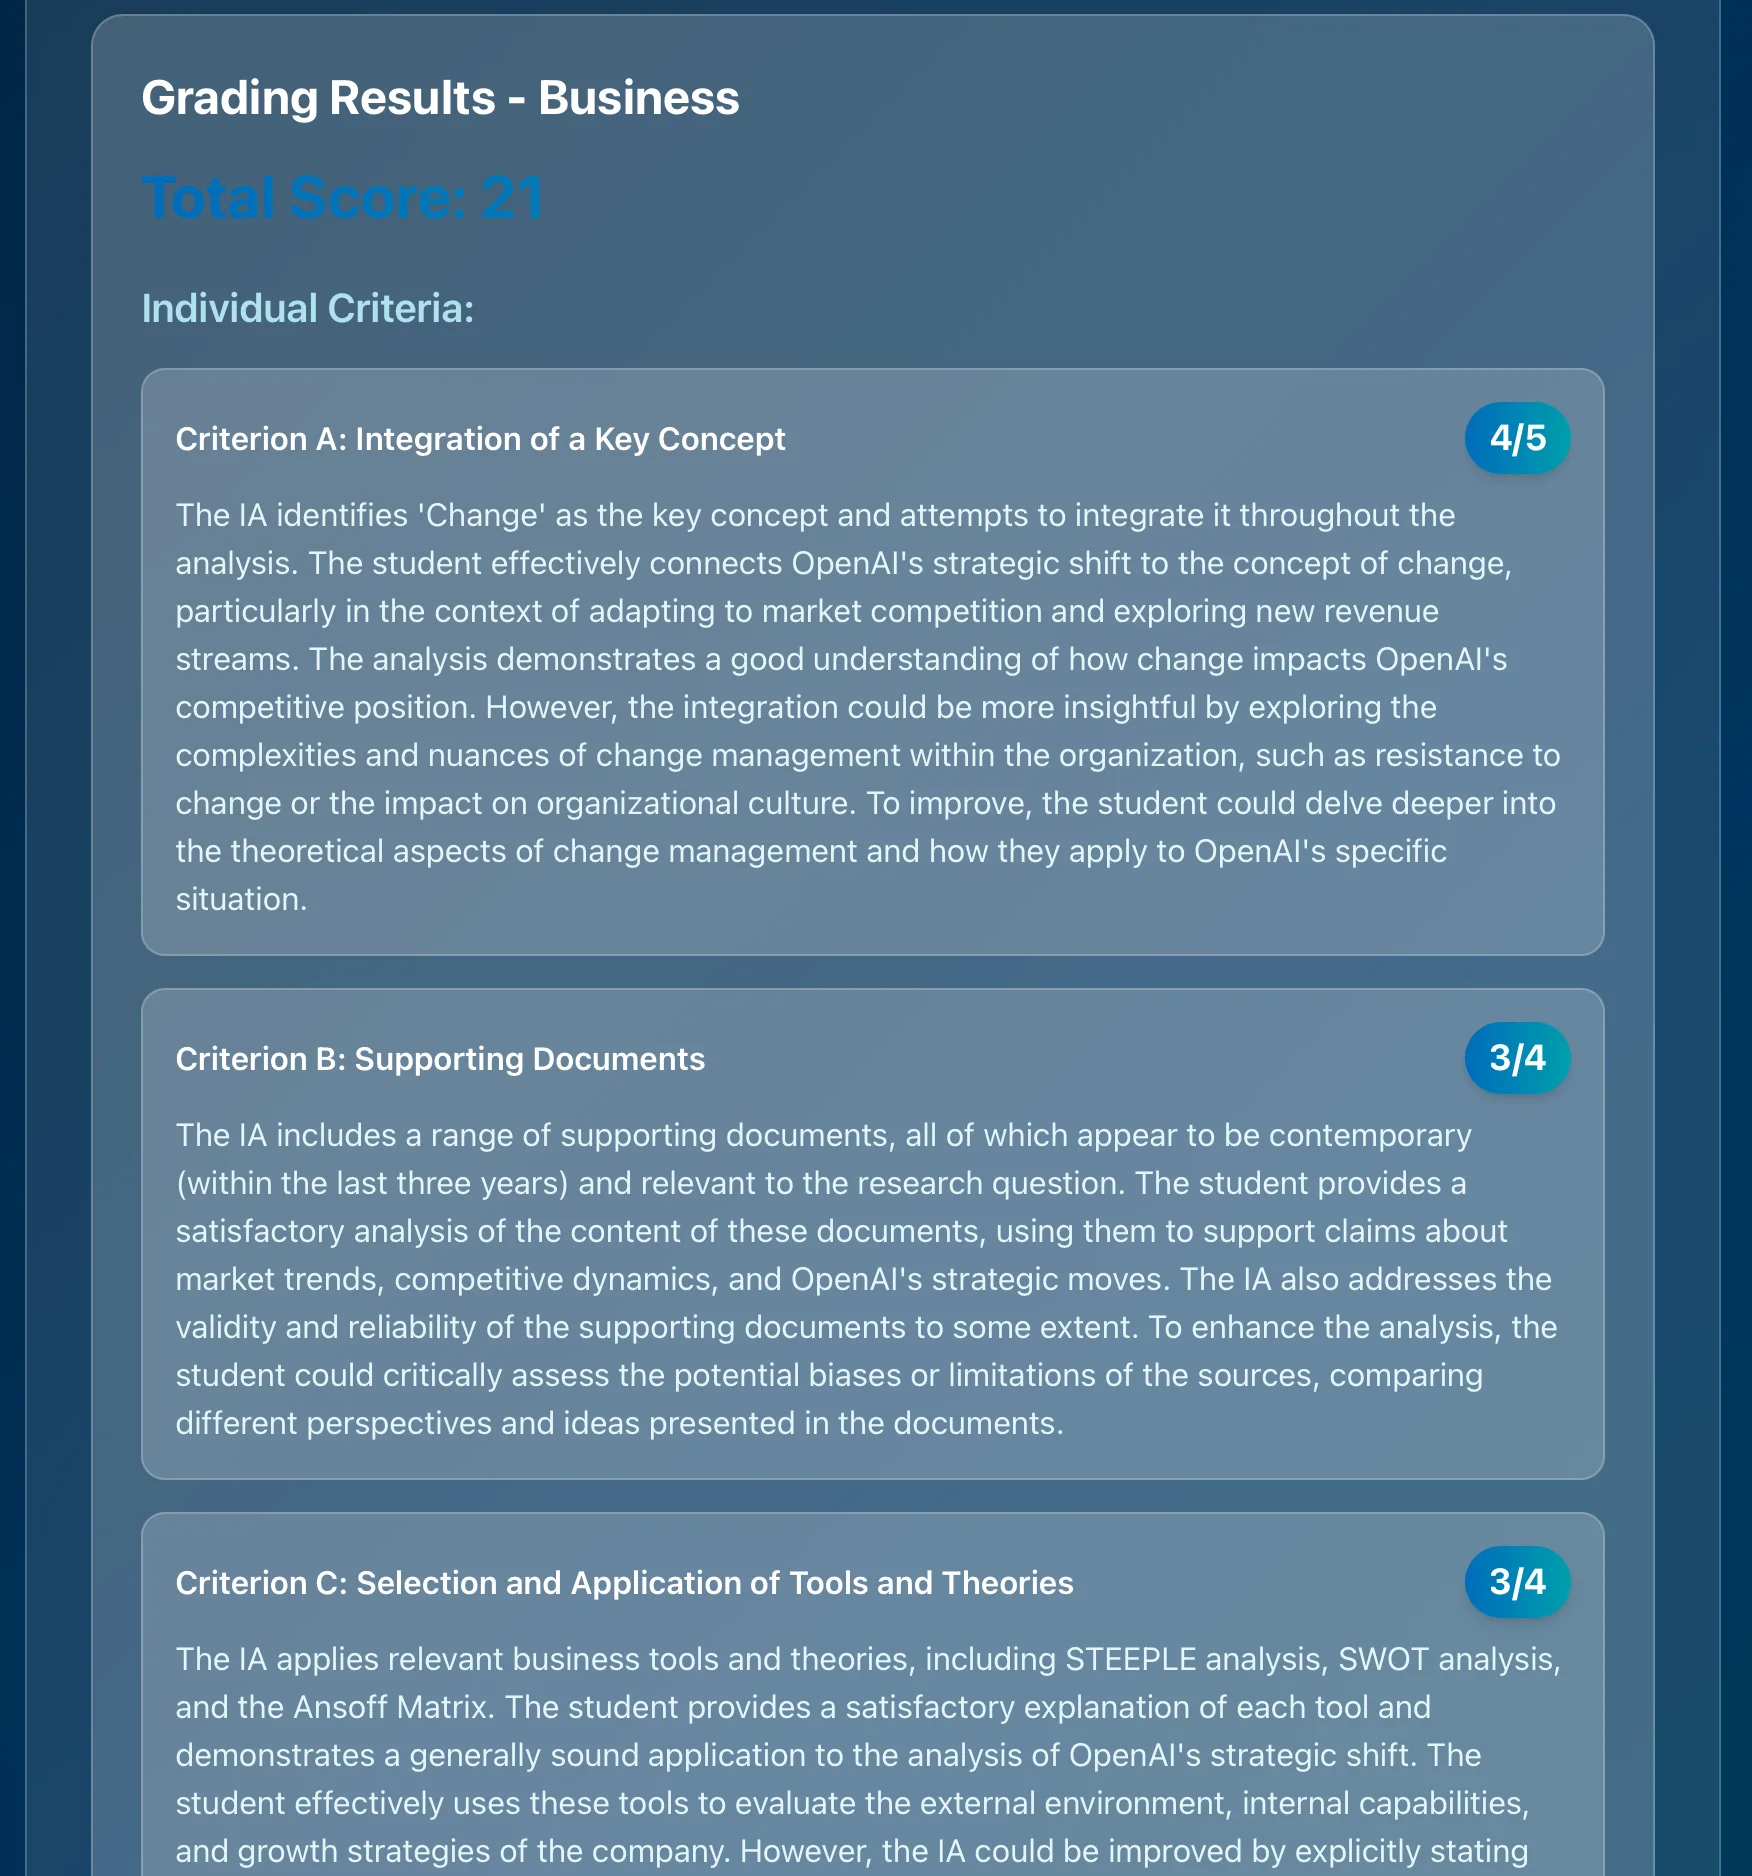
Furthermore, AI grading assistants like Marksy are emerging as valuable resources for both students and teachers. Marksy provides instant, accurate, and detailed feedback on student work based on official IB rubrics. This helps students understand exactly how to improve their work and allows teachers to save time while maintaining assessment quality.
Marksy uses official IB criteria to ensure accuracy and fairness, providing rubric-aligned scoring, detailed criterion-by-criterion feedback, and suggestions for improvement. Imagine receiving instant feedback on your IA draft, highlighting areas where you excel and areas where you need to improve, all aligned with the official IB rubric. This level of personalized feedback can significantly enhance your learning and improve your IA score. For teachers, Marksy streamlines the grading process, allowing them to provide consistent and detailed feedback to all students in a fraction of the time. This frees up valuable time for lesson planning, student support, and other important tasks.
Conclusion with Clear Next Steps
Mastering the IB Design Technology IA requires a thorough understanding of the Design Cycle, a commitment to rigorous research and experimentation, and a willingness to seek feedback and iterate on your designs. By following the tips and strategies outlined in this guide, you'll be well-equipped to create a high-scoring IA that showcases your design skills and creativity.
Next Steps:
- Review the IB Design Technology Subject Guide: Familiarize yourself with the official assessment criteria and requirements.
- Choose a Meaningful Problem: Select a problem that you're passionate about and that has a real impact on users.
- Start Early and Plan Ahead: Create a detailed timeline and break down the IA into smaller, manageable tasks.
- Seek Feedback Regularly: Ask your teacher, peers, and other experts for feedback throughout the IA process.
- Explore AI Grading Assistants: Consider using tools like Marksy to receive instant, accurate, and detailed feedback on your work.
Ready to streamline your IB Design Technology IA grading process or get instant feedback on your own work? Try Marksy for free today and experience the power of AI-powered assessment! Sign up for a free trial and see how Marksy can help you achieve a top score or save valuable time in your grading workflow.